Github Action 妳各位,注意 Heroku !

 ·  ☕ 5 

前面有一篇文章,在描述 Github Action 做 CI/CD 的好處,對於 Github Action 還不太了解的朋友可以參考 Github Action 起步走第一式了解一下最基礎的東西怎麼用吧~

在 CI/CD 總有一個階段會需要啊我們應應用服務部署到 Server 上提供對應的服務,對於初期快速發展的公司來說 Heroku 是一個滿好用的平台,可以直接把 source code push 上去, Heroku 會提供免費帳戶每個月 450 個小時的,開通信用卡,還會額外增加 550 個小時的免費時數,此外 Heroku 會幫你設定相關的 Url 讓外部可以讀取你的服務,這讓開發人員不用擔心 infrastructure 的問題,可以更加專注在 application 的開發。

這篇文章主要是一個小範例,我們可以在 Github Action 中嵌入一個 Job 讓服務部署到 Heroku上~

申請 Heroku 帳號

首先我們要去申請 Heroku 帳號 ,這邊非常簡單把他打米字號的欄位填一填寫一寫就沒問題了~


完成這個完成這個申請帳號的步驟之後,接著開一個 Heroku 的應用程式,透過介面上的 New 的 Create new app 建立一個應用程式,需要注意的是App name 只能用小寫的英文,而且是沒有被使用過的,基本上這樣就完成了跟在 Github 上建立一個 Repository 一樣簡單。

安裝 Heroku CLI

安裝 Heroku CLI 這個部分也相當的簡單安裝過程可以參考官方的教學,我這邊以 MACOS 作為示範有其他作業系統需求的請麻煩請參考官網囉~

brew tap heroku/brew && brew install heroku

Updating Homebrew...
==> Auto-updated Homebrew!
Updated 3 taps (homebrew/core, homebrew/cask and homebrew/cask-fonts).
...
...
==> Installing dependencies for heroku/brew/heroku: heroku/brew/heroku-node
==> Installing heroku/brew/heroku dependency: heroku/brew/heroku-node
🍺  /usr/local/Cellar/heroku-node/12.16.2: 3 files, 42.2MB, built in 3 seconds
==> Installing heroku/brew/heroku
...

測試一下 Heroku CLI 是不是已經裝好了

 1
 2
 3
 4
 5
 6
 7
 8
 9
10
11
12
13
14
15
16
17
18
19
20
21
22
23
24
25
26
27
28
29
30
31
32
33
34
35
36
37
38
39
40
41
42
43
44
45
46
47
48
49
50
51
52
53
heroku

CLI to interact with Heroku

VERSION
  heroku/7.41.1 darwin-x64 node-v12.16.2

USAGE
  $ heroku [COMMAND]

COMMANDS
  access          manage user access to apps
  addons          tools and services for developing, extending, and operating
                  your app
  apps            manage apps on Heroku
  auth            check 2fa status
  authorizations  OAuth authorizations
  autocomplete    display autocomplete installation instructions
  buildpacks      scripts used to compile apps
  certs           a topic for the ssl plugin
  ci              run an application test suite on Heroku
  clients         OAuth clients on the platform
  config          environment variables of apps
  container       Use containers to build and deploy Heroku apps
  domains         custom domains for apps
  drains          forward logs to syslog or HTTPS
  features        add/remove app features
  git             manage local git repository for app
  help            display help for heroku
  keys            add/remove account ssh keys
  labs            add/remove experimental features
  local           run Heroku app locally
  logs            display recent log output
  maintenance     enable/disable access to app
  members         manage organization members
  notifications   display notifications
  orgs            manage organizations
  pg              manage postgresql databases
  pipelines       manage pipelines
  plugins         list installed plugins
  ps              Client tools for Heroku Exec
  psql            open a psql shell to the database
  redis           manage heroku redis instances
  regions         list available regions for deployment
  releases        display the releases for an app
  reviewapps      manage reviewapps in pipelines
  run             run a one-off process inside a Heroku dyno
  sessions        OAuth sessions
  spaces          manage heroku private spaces
  status          status of the Heroku platform
  teams           manage teams
  update          update the Heroku CLI
  webhooks        list webhooks on an app

測試 Heroku

這邊以一個簡單的 go server 作為範例,程式碼如下所示。當我們對這個 server 發起請求他會回應你 現在 server 是使用哪一個 port 跟你做溝通。

 1
 2
 3
 4
 5
 6
 7
 8
 9
10
11
12
13
14
15
16
17
package main

import (
	"net/http"
	"os"
)

func main() {
	http.HandleFunc("/", func(w http.ResponseWriter, r *http.Request) {
		w.WriteHeader(http.StatusOK)
		w.Header().Set("Content-Type", "text/html; charset=utf-8")
                p:=os.Getenv("PORT")
		w.Write([]byte(p))
	})

	http.ListenAndServe("0.0.0.0:"+os.Getenv("PORT"), nil)
}

透過 Heroku CLI 登入 Heroku ,驗證完身份後,就能夠透過 Git 把source code 推到 Heroku 上囉~

1
2
3
4
5
6
heroku login

heroku: Press any key to open up the browser to login or q to exit:
Opening browser to https://cli-auth.heroku.com/auth/cli/browser/5e83cd9d-51cc-4676-b0be-d240a1f5c480
Logging in... done
...

接著設定 heroku git 把git remote url 設定好

heroku git:remote -a example-githubaction
set git remote heroku to https://git.heroku.com/example-githubaction.git

先看看 Heroku 有沒有加到 git remote url

1
2
3
4
5
git remote -v
heroku	https://git.heroku.com/example-githubaction.git (fetch)
heroku	https://git.heroku.com/example-githubaction.git (push)
origin	https://github.com/jjmengze/heroku-go.git (fetch)
origin	https://github.com/jjmengze/heroku-go.git (push)

最後透過git push 指令將source code上傳到 Heroku

 1
 2
 3
 4
 5
 6
 7
 8
 9
10
11
12
13
14
15
16
17
18
19
20
git push heroku master
Enumerating objects: 10, done.
Counting objects: 100% (10/10), done.
Delta compression using up to 8 threads
Compressing objects: 100% (6/6), done.
Writing objects: 100% (10/10), 1.25 KiB | 640.00 KiB/s, done.
Total 10 (delta 0), reused 0 (delta 0)
remote: Compressing source files... done.
remote: Building source:
remote:
remote: -----> Go app detected
...
...
remote: -----> Launching...
remote:        Released v3
remote:        https://example-githubaction.herokuapp.com/ deployed to Heroku
remote:
remote: Verifying deploy... done.
To https://git.heroku.com/example-githubaction.git
 * [new branch]      master -> master

完成後回到之前在 Heroku 上建立的應用程式,並且在上方的選項點選 Settings

最下方 Heroku 會告訴你這個應用程式的 Domain ,一般來說會是 https://<appname>.herokuapp.com/,所以以本篇的例子會是 https://example-githubaction.herokuapp.com/ 。到頁面下方檢查一下 Domain是不是這個~

可以請求一下這個 domain 看看得到的結果是什麼

1
2
curl https://example-githubaction.herokuapp.com/
59048

表示目前 server 是用 59048 的 port 跟你進行溝通,這邊我就想到壞壞的事情惹,那我能不能用 Heroku 提供的服務 在裡面啟用一個 sshd ,另類 VM 的概念xD (不過那又是另外一個故事了)

改到 Github Action

既然純手動 ( manually setup ) 可以完成,那我相信透過 CI/CD 自動化機制也可以完成!

這邊可以到 Github Marketplace 去找找有沒有人做相關的 Action ,好的工程師第一步要學會怎麼找資料 xD

這邊可以看到有不少 Action 都有在做 HeroKu 相關的部署,可以參考人家怎麼實作在試試看能不能用更簡單的方法做一個出來。

這邊我直接給出一個方案所有程式碼與內容可以參考我在 Github 的範例專案,有興趣的可以試試看,基本上的思路是透過 Heroku 提供的 container 服務直接把 source code 包成 container 並且上傳到 heroku image registry 上,相關的部署以及詳細動作可以參考官方的範例

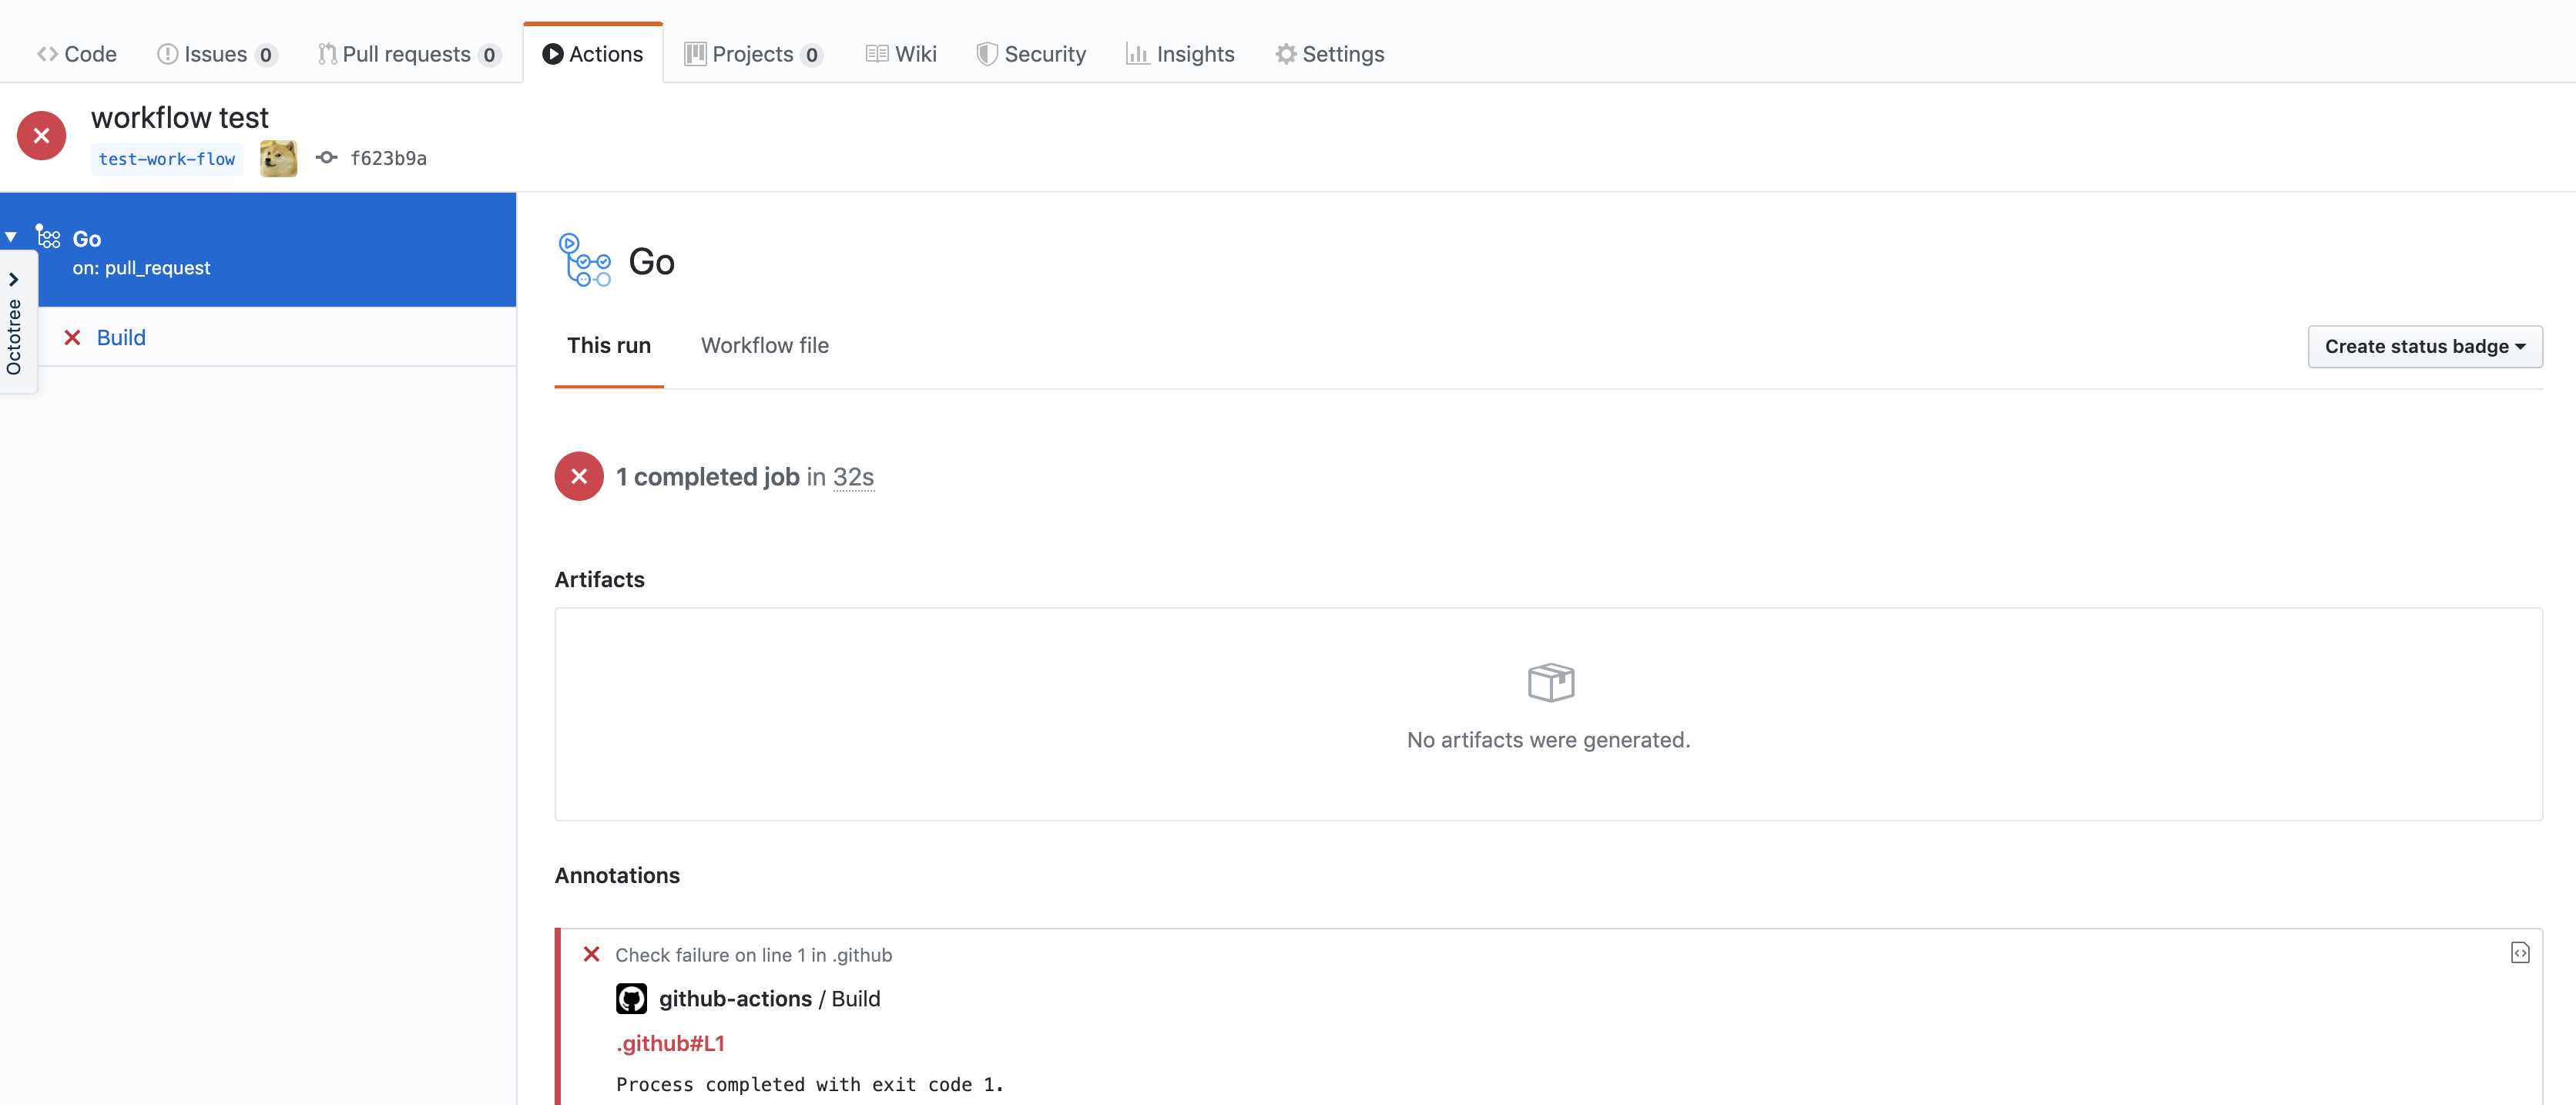
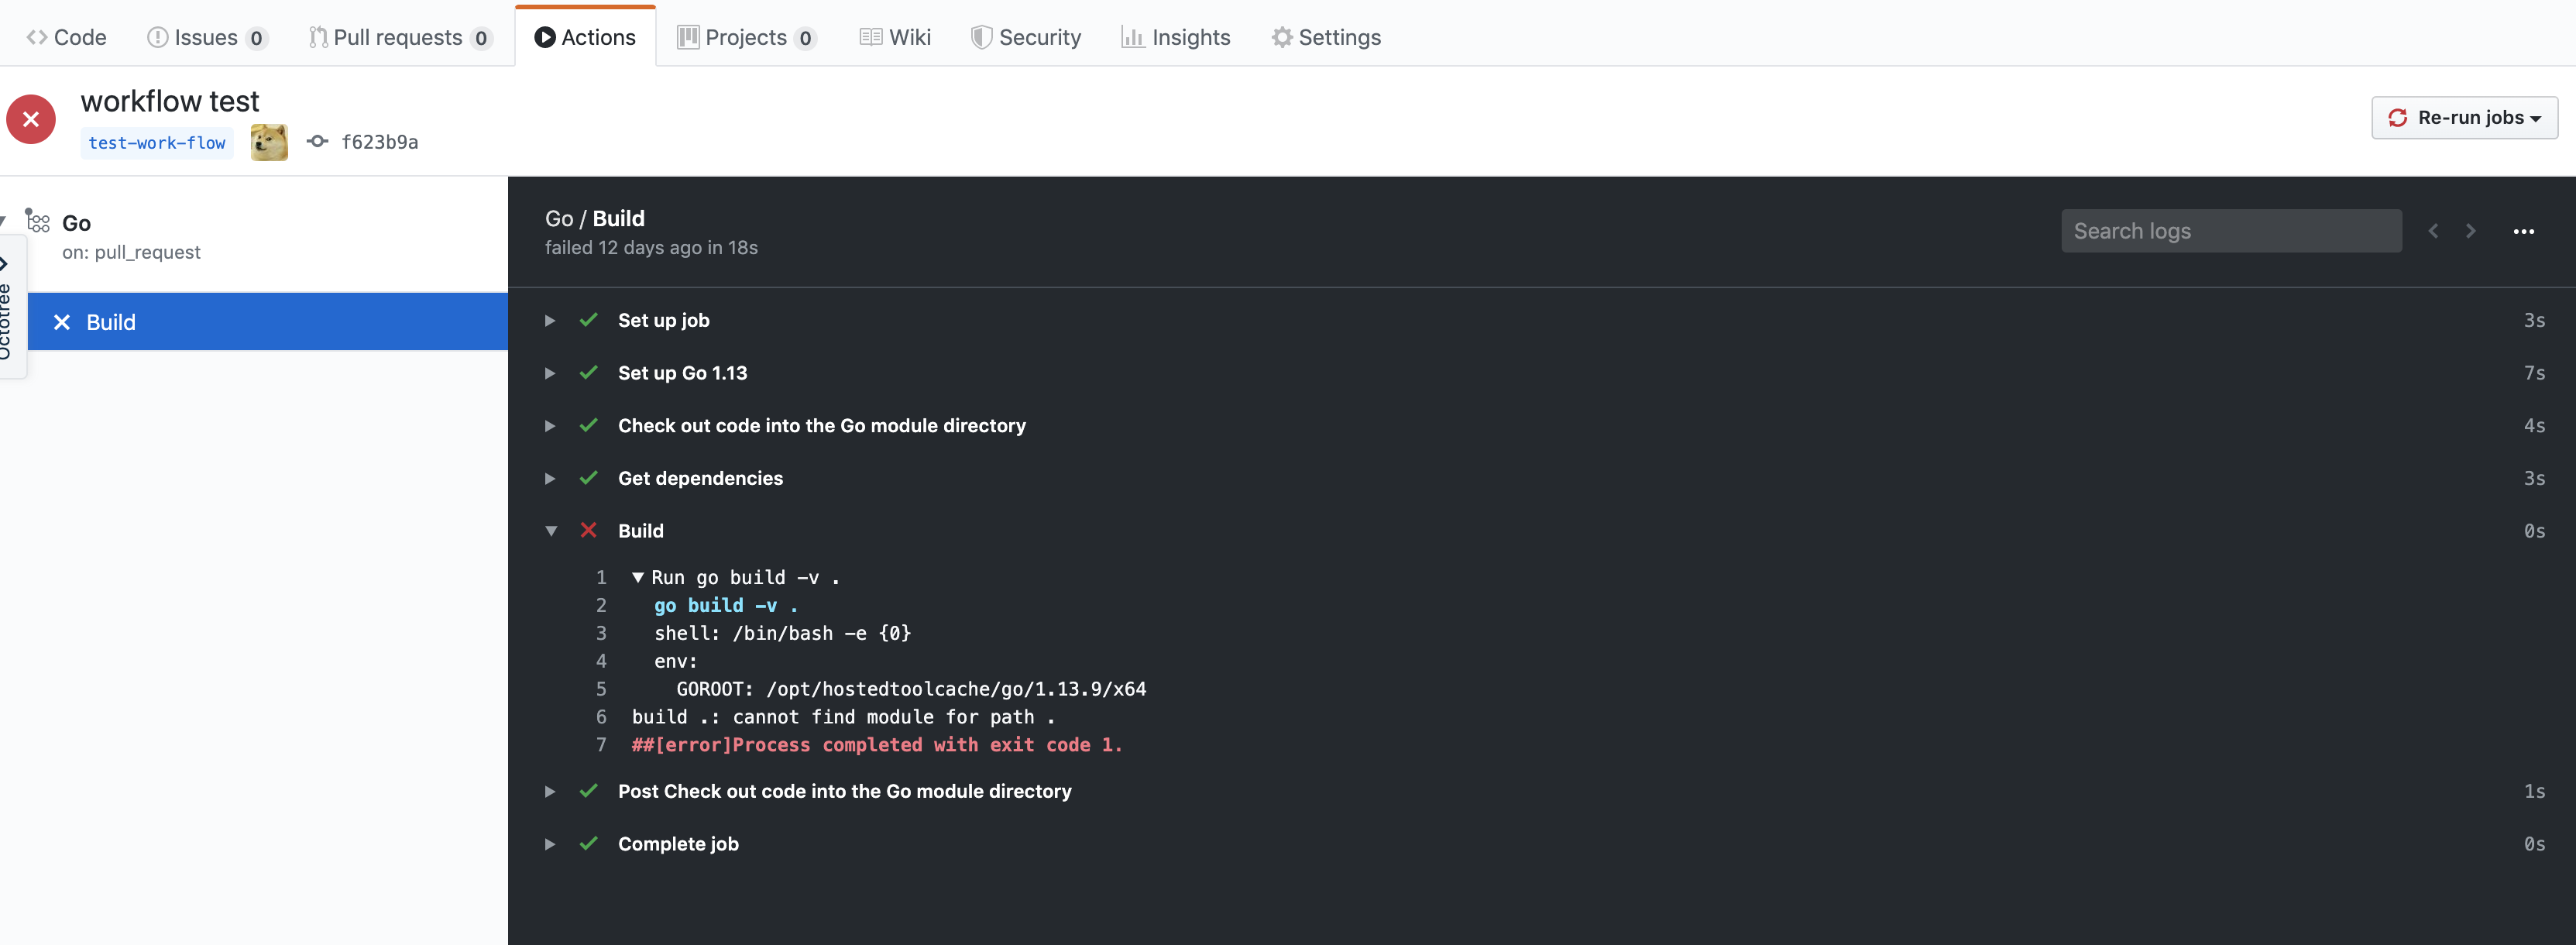
這邊我直接上github action 整合Heroku container image 後的 ci yaml給大家參考,大家也可以依照個做變化做成自己想要的樣子。

 1
 2
 3
 4
 5
 6
 7
 8
 9
10
11
12
13
14
15
16
17
18
  push:
    name: Push
    runs-on: ubuntu-latest
    steps:
    - name: Check out code into the Go module directory
      uses: actions/checkout@v2
    - name: Login to Heroku Container registry
      env: 
        HEROKU_API_KEY: ${{ secrets.HEROKU_API_KEY }}
      run: heroku container:login 
    - name: Build and push
      env:
        HEROKU_API_KEY: ${{ secrets.HEROKU_API_KEY }}
      run: heroku container:push -a ${{ env.APP_NAME }}  web
    - name: Release
      env:
        HEROKU_API_KEY: ${{ secrets.HEROKU_API_KEY }}
      run: heroku container:release -a ${{ env.APP_NAME }}  web

其中可以看到 push 這個 stage 執行了四個 steps ,比較要關注的是後面那三個。分別是執行

  • heroku container:login
  • heroku container:push -a ${{ env.APP_NAME }} web
  • heroku container:release -a ${{ env.APP_NAME }} web

這三部分別對應的是

  • 登入 heroku
  • 構建 Container image 並將其推送到 Heroku Container Registry
  • 將 Heroku Container Registry 上的 Container image 進行部署與發佈

HEROKU_API_KEY 以及 APP_NAME 都可以在 Github 的 CI/CD 服務直接做環境變數的編輯,透過這一種方式我們可以很簡單的把服務部署到Heroku上面。開發人員可以快速的部署與測試自己的服務~ CI/CD 帶來的好處多多,希望大家可以多多嘗試。

結束語

今天非常簡單的介紹了 Heroku 與 Github Action 的整合的功能,以及怎麼快速得使用 Heroku 給外部做存取,下次有機會再來介紹他跟docker怎麼整合以及怎麼撰寫自己的 action 貢獻給 Github Action Marketplace 讓大家來使用。


Meng Ze Li
Meng Ze Li
Kubernetes / DevOps / Backend